
Usage
Table of contents
If you haven’t yet added the EPICS urRobot support to an IOC, please see the Quickstart page for instructions. After starting an IOC with the urRobot support included, you are ready to use your UR robot through EPICS.
Most features of the robot are accessible through the provided GUIs using either MEDM, caQtDM, or CSS-Phoebus (still in development). To start the screens, a start_urRobot_gui bash script is provided at urRobot/iocs/urExample/start_urRobot_gui. Copy the script to the top level directory of your IOC and run it without any arguments to open the caQtDM screens, however optionally you can specify “medm” or “phoebus” as argument to the script to use either of those display managers. The below examples will show the caQtDM GUIs, however the MEDM and CSS-Phoebus versions are nearly identical. Users are encouraged to create their own GUIs in addition to the ones provided for more specific needs.
Logging
The UR robot EPICS driver uses spdlog for logging. By default you will only see log messages from the UR robot driver in the IOC console with “info”, “warning”, or “error” severity, however if you’d like to see additional messages (with “debug” severity), you can set the “SPDLOG_LEVEL” environent variable before running the IOC. The easiest way is to add the following command to your your .bashrc: export SPDLOG_LEVEL=debug,mylogger=trace.
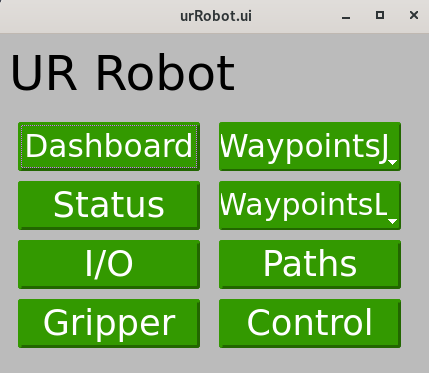
Main Menu
After running the start_urRobot_gui script, you will be greeted with a menu which contains links to all the other provided screens.
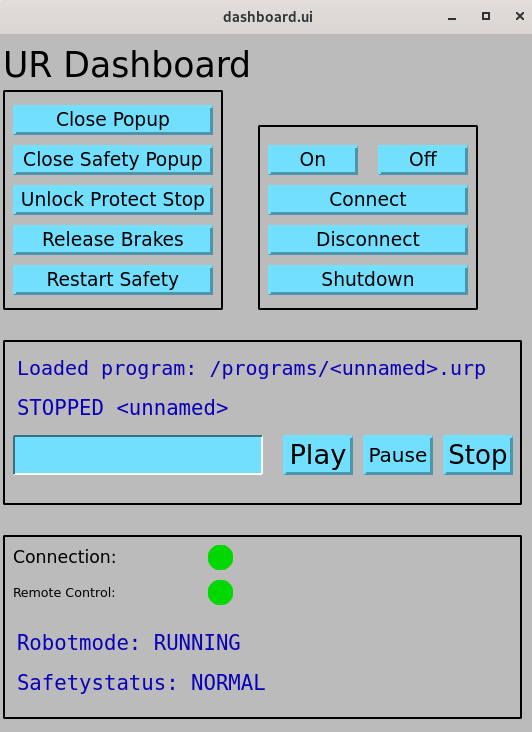
UR Dashboard
The dashboard screen provides access to the most basic features of the robot like powering on/off, and releasing brakes. It also allows a user to load and play URP programs that are saved in the robot controller. The input for the URP filename ($(P)Dashboard:LoadURP) is the name of the URP file that is present in the /programs directory on the robot controller.
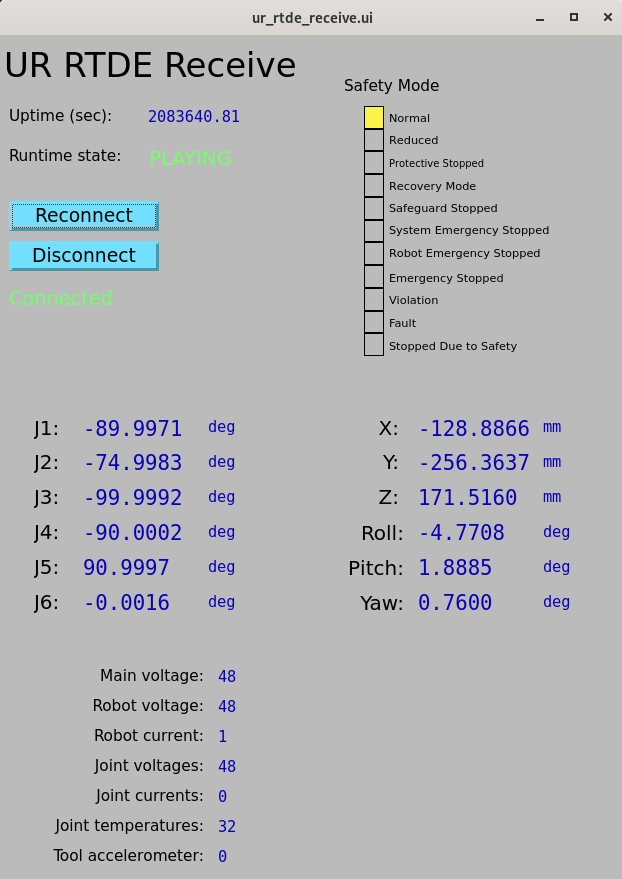
RTDE Receive
The RTDE Receive screen shows all the basic status information about the robot. The only interactive element is the connect/disconnect buttons which allow for connecting and disconnecting to the RTDE receive interface.
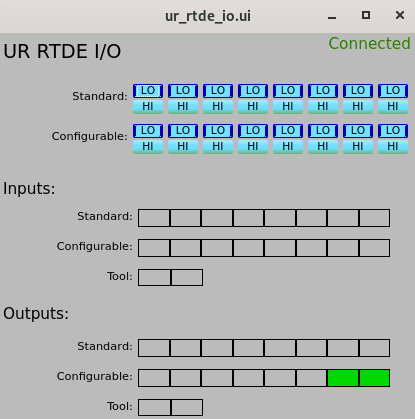
RTDE I/O
The I/O screen allows for setting and reading digital and analog inputs and outputs on the robot controller.
RTDE Control
The RTDE Control screen can be used to move the robot by directly commanding joint or end-effector positions. It also has a button to enable/disable teach (freedrive) mode.
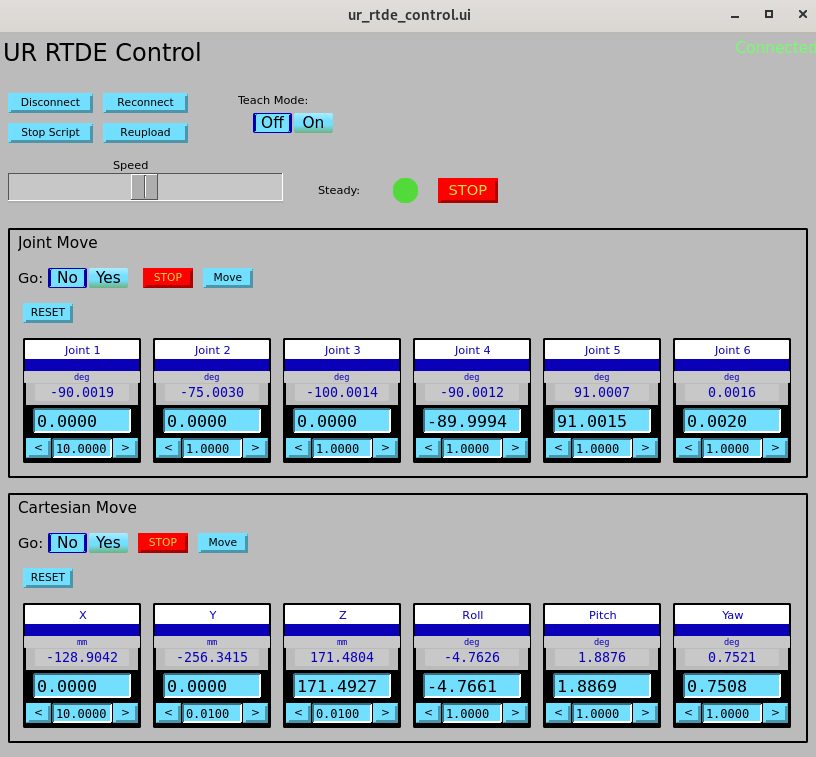
Although the default control GUI may look similar to typical EPICS motor screens, the robot’s joint are not true EPICS motors. The x, y, z, roll, pitch, and yaw motors are virtual axes and moving them will move one or more joint motors. The joint motors themselves are independent of each other, however motion of any joint motor will affect the position of the tool. To reconcile this and reduce the likelyhood of accidentally commanding motion you didn’t indend, every time motion completes, the command values are automatically set to the current readback values, similar to an EPICS motor record. The “Go” toggles (which write to the $(P)Control:AutoMoveJ or $(P)Control:AutoMoveL PVs) are similar to the Go/Move options in the EPICS motor record. For example, to move Joint 1 to -75deg, if “Go” is set to “No” ($(P)Control:AutoMoveJ=0), then you must set Joint 1 to -75deg and click “Move” ($(P)Control:moveJ). If “Go” is set to “Yes” ($(P)Control:AutoMoveJ=1), the robot will begin moving as soon as the commanded values change, so typing -75 in the box for Joint 1 and clicking enter will start the robot moving. The same goes for the Cartesian moves. Note that the “Move” buttons tell the robot to move to the current joint or cartesian configuration defined by all 6 of the respective target values (J1Cmd, J2cmd… or PoseXCmd, PoseYCmd…).
Safety Event Handling
When a safety event occurs (protective stop, safeguard stop, emergency stop, etc.), the $(P)Receive:SafetyStatusBits PV will change from its normal value of 1 to a non-1 value. The driver detects this and automatically aborts any in-progress motion. Additionally, a calcout record monitors SafetyStatusBits and triggers $(P)Control:Stop (which stops any in-progress motion and aborts any running path) and $(P)Dashboard:Stop (which stops the UR program at the controller level) when a safety event is detected.
Once the safety event is cleared (e.g. the protective stop is unlocked via the teach pendant or $(P)Dashboard:UnlockProtectiveStop), the robot will remain idle. Use $(P)Control:ReuploadControlScript to reconnect the RTDE control interface before commanding further motion.
Robotiq Gripper
Currently the Robotiq Hand-E gripper is the only supported gripper in this EPICS module, howevever other grippers and tools could still be made to work through waypoint actions which are discussed later. The gripper screen has buttons for opening, closing, connecting, activating, and auto-calibrating. It also shows the open/closed state, actual position, and motion status.
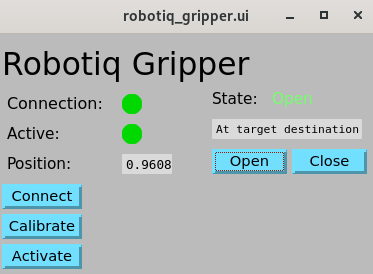
Although the auto-calibration works quite well, it requires the gripper to move through it’s full range to determine the correct open and closed positions, and must be re-calibrated each IOC restart. To avoid this, you can find the open and closed positions for your gripper and specify them when loading the gripper support by passing the MIN_POS and MAX_POS macros to robotiq_gripper.db. Additionally the AUTO_ACTIVATE macro can be set to YES (or NO) to automatically activate the gripper which must be done after a power cycle.
A command line tool for finding the min/max positions is provided with this EPICS support. In the bin directory of the urRobot support (for example urRobot/bin/rhel9-x86_64/) you will find a calibrate_gripper program. Running this with your robot’s IP as argument will give you the min/max positions. Note that this will cause the gripper to move through its full range of motion, so ensure there is nothing in the way of the gripper before running this program.
$ ./calibrate_gripper 164.54.100.100
Auto calibrating gripper...
Gripper calibrated

Min (closed) = 3
Max (open)   = 248
For my gripper, I found the minimum and maximum positions to be 3 and 248 respectively, so I load robotiq_gripper.db as follows:
dbLoadRecords("$(URROBOT)/db/robotiq_gripper.db", "P=$(PREFIX), MIN_POS=3, MAX_POS=248, AUTO_ACTIVATE=YES, PORT=gripper")
Waypoints
Waypoints are configurations of the robot which can be defined in either joint space or end-effector space (we also refer to the end-effector position by the tool center point, or TCP). Motion between points when using waypointL.db is done linearly in Cartesian space, so you will also see these referred to as as “Cartesian” waypoints.
Although not currently supported, theoretically we could define waypoints in joint space, then execute linear motion in Cartesian space to the waypoint, or conversely define a waypoint in Cartesian space and exectute linear motion in joint space to the waypoint. For now though, executing a move to a joint waypoint (waypointJ.db) will move linearly in joint space, and executing a move to a Cartesian waypoint (waypointL.db) will move linearly in Cartesian (end-effector) space.
Two screens are provided for defining joint or Cartesian waypoints:
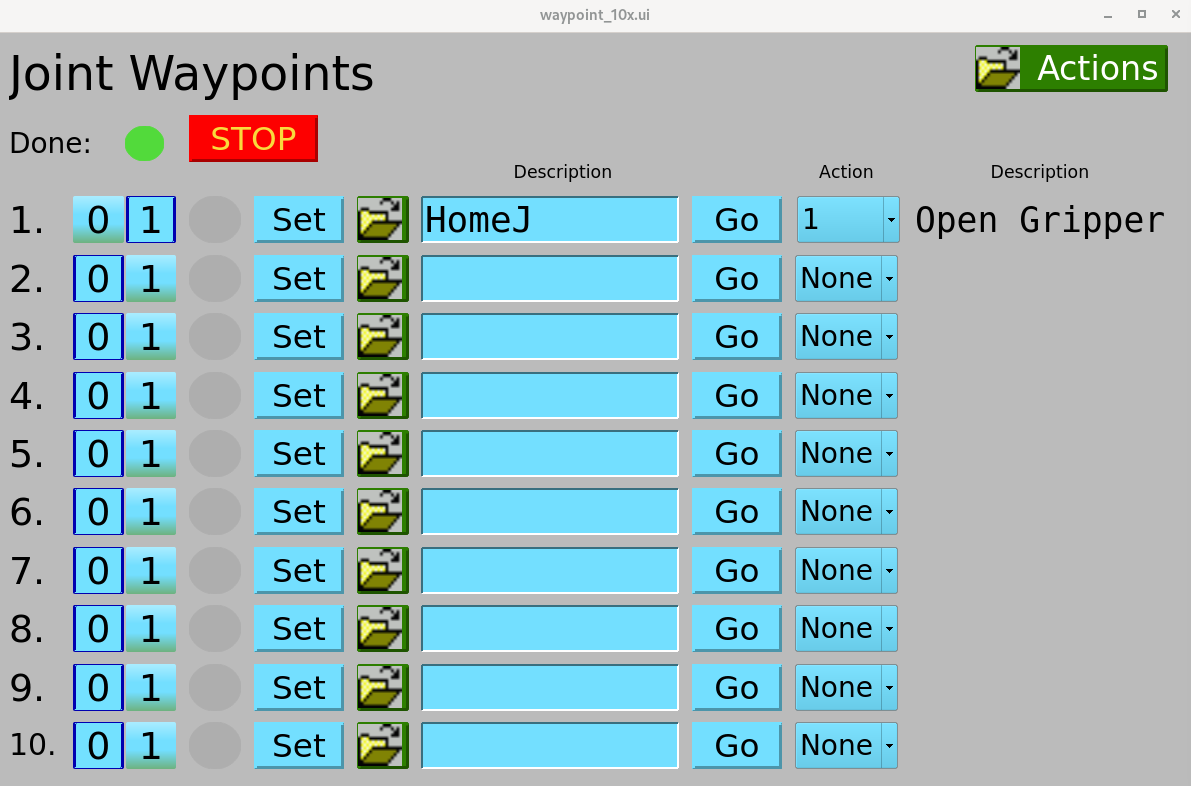
A single waypoint is defined by an instance of waypointL.db or waypointJ.db. It is typically most useful to load many waypoints in your IOC startup script via paths.iocsh, then define them at runtime. .req files for autosave are provided in urRobotApp/Db/. Looking at the above Cartesian Waypoint display, from left to right on each line you have the following:
- Waypoint number for quick reference (call it
$(N)) which ranges from 1-10 in this example. - Enable(ON)/Disable(OFF) toggle (
$(P)WaypointL:$(N):Enabled) - Indicator for when the waypoint is reached (
$(P)WaypointL:$(N):Reached=1) or when the robot is en-route to the waypoint ($(P)WaypointL:$(N):Busy=1). Green means the robot is at the waypoint, yellow means it is on the way to the waypoint, otherwise it will be gray. - “Set” button to save the current robot configuration to the waypoint (
$(P)WaypointL:$(N):Reset) - Related display to view and edit the waypoint coordinates and dynamics.
- A string description of the waypoint (
$(P)WaypointL:$(N)) - “Go” button to attempt to move the robot from the current configuration to the waypoint (
$(P)WaypointL:$(N):moveL)- Before motion is attempted, the driver checks that the robot will remain within safety limits throughout the move. If the move will break the safety limits, it will not be attempted and a message saying so will be printed in the IOC console. The move will also not be started if another move is currently in progress.
- Waypoint action number (
$(P)WaypointL:$(N):ActionOpt) which selects the action to perform after the robot reaches the waypoint (0 = no action, N = ActionSseqN). Waypoint actions are discussed in greater detail in the next section. - String description of the selected waypoint action
- At the top of the display there is a indicator to signal when a motion is done (
$(P)Control:AsyncMoveDone) and a stop button to stop a move in progress.
Waypoint Actions
Each waypoint has an associated action which is executed automatically after the robot reaches the waypoint. Each action N is defined by two records that the user configures:
$(P)ActionSseqN— an sseq record defining the steps the action performs (e.g., open a gripper, send a trigger signal, move an auxiliary axis). This record is processed automatically when the robot arrives at a waypoint that has actionNselected.$(P)ActionDoneCalcN— a calcout record that signals when the action is complete. Its output should be1when the action is done and0while it is still running. The path execution engine waits for this record to output1before moving on to the next waypoint.
Any number of actions can be defined by loading instances of waypoint_action.db with different values of N.
To assign an action to a waypoint, set the ActionOpt field on the waypoint (e.g. $(P)WaypointJ:$(N):ActionOpt) to the desired action number, or 0 for no action. When ActionOpt changes, the internal action_opt.lua script automatically connects the selected action’s sseq and calcout records to that waypoint.
The sseq records can be configured at runtime using the editSseq GUI (provided by the CALC module’s editSseq.db, loaded by paths.iocsh).
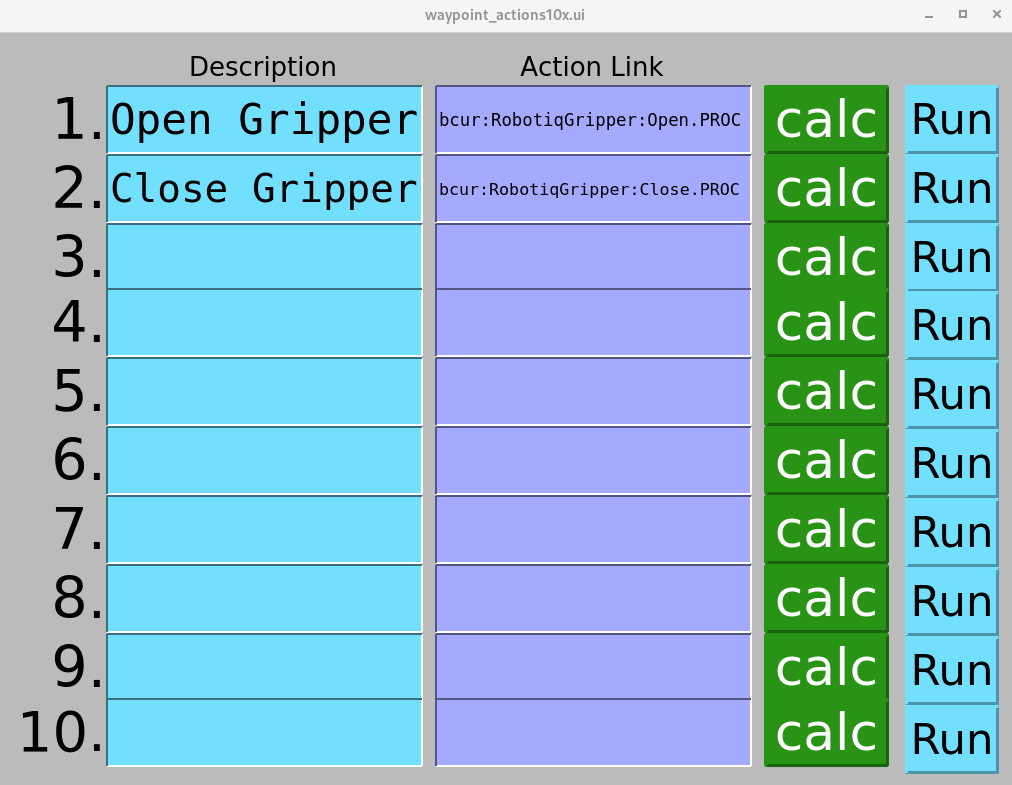
Example: To create a custom action that opens a gripper and waits for it to finish:
- Configure
$(P)ActionSseq1to write to the gripper open PV (e.g.$(P)RobotiqGripper:Open). - Configure
$(P)ActionDoneCalc1to monitor the gripper’sIsOpenPV: setINPA = $(P)RobotiqGripper:IsOpen CPandCALC = A. - On the desired waypoint, set
ActionOpt = 1.
The first two actions come pre-configured for opening (ActionSseq1) and closing (ActionSseq2) the Robotiq gripper, which many users may find useful out of the box.
Paths
After you have defined some waypoints, the provided path support allows you to define and save sequences of waypoints for the robot to follow. Each path is comprised of a number of path_waypoint.db instances and a path.db instance. Waypoints, actions, and paths are all loaded via paths.iocsh.
After selecting “Paths” from the main menu, you will get the path_top10x screen:
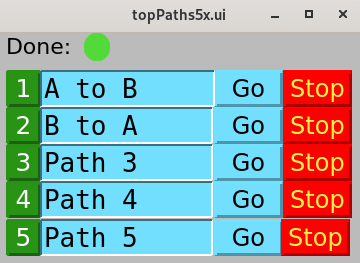
From this screen you can give a string description of the path and execute and stop the path with the “Go” and “Stop” buttons. If you select the green path number button on the left you will get the following screen which lets you define the path:
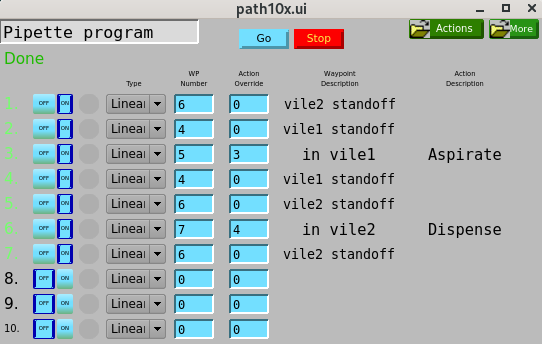
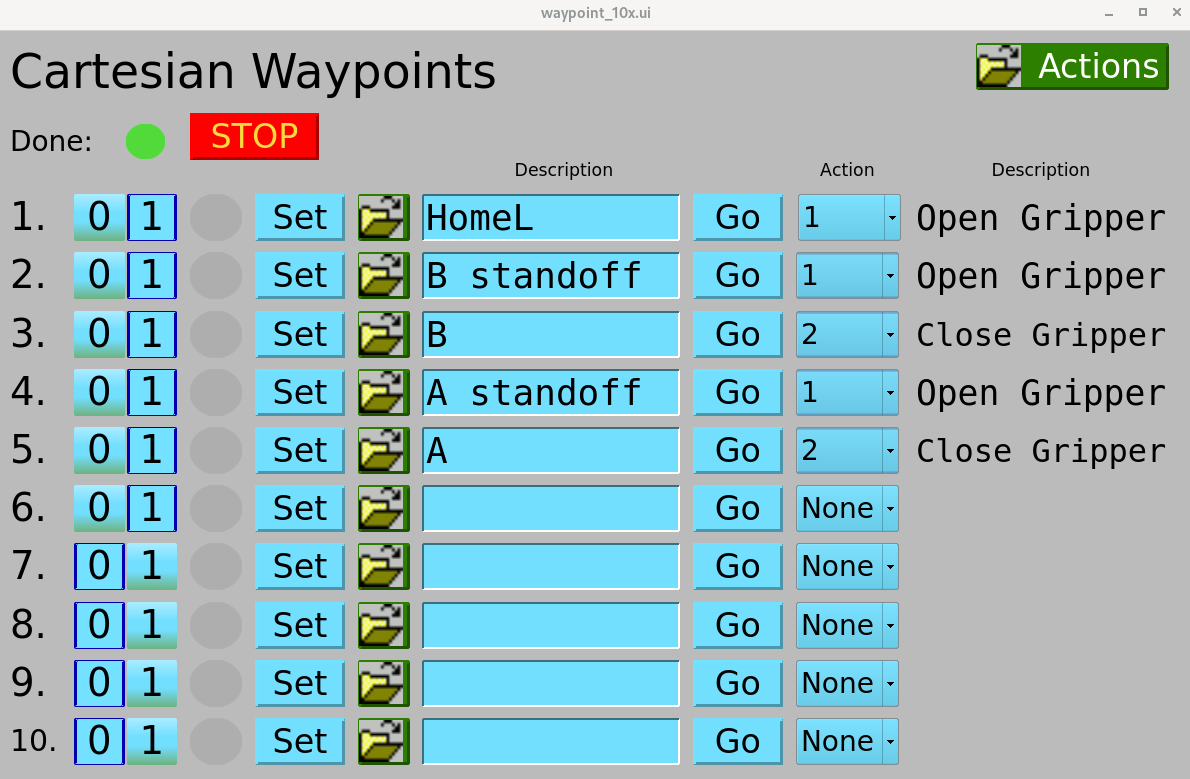
Looking at the above screen for Path $(N) which we have named “A to B”, each line (1-10 on this screen) defines a waypoint along the path. This path in particular uses some predefined waypoints to create a pick and place operation. From left to right, each line contains the following:
- Path point number for reference (
$(K)) - Enable(1)/Disable(0) toggle (
$(P)Path$(N):$(K):Enabled) - Indicator for when the waypoint is reached (
$(P)Path$(N):$(K):Reached) - Type of path waypoint (
$(P)Path$(N):$(K):Type) which can either be Joint or Linear (for waypointJ or waypointL) - Number of path waypoint (
$(P)Path$(N):$(K):Number) - Action override for path waypoint (
$(P)Path$(N):$(K):ActionOverride)- The action override allows you to override the action defined for a waypoint. This is useful when you want to go to the same waypoint multiple times in a path but with different actions. After the path is complete, the original action that was defined for the waypoint will be restored.
- Description of the selection waypoint (
$(P)Path$(N):$(K):Desc) - Description of the selection waypoint action (
$(P)Path$(N):$(K):ActionDesc).- Note that the waypoint description and waypoint action description will only update when any of the other fields change (type, number, override, etc.)
- “Go” and “Stop” buttons at the top which starts/stops motion along the path. The go button will tell the robot will move to each waypoint, execute the waypoint action, then move to the next waypoint in the path. The stop button will stop motion immediately and abort the path. This means that you must start the path from the beginning if it has been stopped. There is no way to pause a path at this time.
Let’s give a quick example. Say you have defined $(P)WaypointL:3 and you want to set the first point in your path to be WaypointL:3 and to make sure that the gripper is open. For point 1 in your path, you’d set the Type to “Linear”, Number to 3, and Action Override to 1 (open gripper).
Scripting
Some may find it useful to program the robot by interacting with the available PVs in a script. Below an example Python script using PyEpics is provided which demonstrates how to move all six joints by +1.0deg.
from epics import caget, caput

# IOC prefix
PREFIX = "MyIOC:"

# disable AutoMoveJ so we need to trigger move PV to start the move
caput(f"{PREFIX}Control:AutoMoveJ.VAL", 0)

# Get the current joint angles
angles = caget(f"{PREFIX}Receive:ActualJointPositions.VAL")

# Move all joints +1.0deg
angles += 1.0;
for i in range(len(angles)):
    caput(f"{PREFIX}Control:J{i+1}Cmd.VAL", angles[i])

# Execute the move
caput(f"{PREFIX}Control:moveJ.PROC", 1)