Tutorial: Creating an App
This page will provide a brief tutorial on creating a new PVTUI application. It is assumed you have already downloaded and compiled the PVTUI library. If not, (see Building from Source). If you choose to use CMake for your application, a minimal CMakeLists.txt file is given below:
cmake_minimum_required(VERSION 3.22)
project(pvtui-example LANGUAGES CXX)

set(CMAKE_CXX_STANDARD 17)
set(CMAKE_CXX_STANDARD_REQUIRED ON)
set(CMAKE_EXPORT_COMPILE_COMMANDS ON)

# Find pvtui
# Unless pvtui is installed in a standard location (e.g. /usr/lib)
# you'll need to set -Dpvtui_DIR=/path/to/lib/cmake/pvtui
find_package(pvtui REQUIRED)

# Add exectuble and link libraries
add_executable(pvtui-example main.cpp)
target_link_libraries(pvtui-example PRIVATE pvtui::pvtui)
In this tutorial we will create a TUI for the following EPICS database:
record(ao, "$(P)Value") {
    field(DESC, "Tutorial!")
    field(VAL, 0.0)
}

record(ao, "$(P)TweakVal") {
    field(VAL, 1.0)
}

record(calcout, "$(P)TweakFwd") {
    field(INPA, "$(P)Value.VAL")
    field(INPB, "$(P)TweakVal.VAL")
    field(CALC, "A + B")
    field(OUT, "$(P)Value.VAL PP")
}

record(calcout, "$(P)TweakRev") {
    field(INPA, "$(P)Value.VAL")
    field(INPB, "$(P)TweakVal.VAL")
    field(CALC, "A - B")
    field(OUT, "$(P)Value.VAL PP")
}
For this tutorial we will create a simple UI which has buttons to trigger the TweakFwd and TweakRev records as well as an input for the Value.VAL and Value.DESC. Lets start by instantiating the widgets we will need.
We will start with the below code, which is a good starting point for most applications.
#include <pvtui/pvtui.hpp>
#include <ftxui/component/component.hpp>

using namespace ftxui;
using namespace pvtui;

int main(int argc, char *argv[]) {

    // Instantiate an App to manage everything
    pvtui::App app(argc, argv);

    // Get positional arguments (the prefix, PV names, etc.)
    auto pos_args = app.args.positional_args();
    if (pos_args.size() < 2) {
        printf("Usage: tutorial <prefix>\n");
        return EXIT_FAILURE;
    }
    const std::string prefix = pos_args[1];

    // Create all the widgets we need
    // InputWidget desc(app, prefix + "pvname.DESC", PVPutType::String);

    // Create a container for a logical group of widgets, and pipe
    // a Renderer to define its visual layout.
    // auto my_container = Container::Vertical({
    //     desc.component(),
    // }) | Renderer([&](Element) {
    //     return desc.component()->Render();
    // });

    // Run the main loop
    app.run(my_container);
}
The above should apply to most basic TUIs. The prefix is taken as a positional argument and prepended to each PV name.
First we will define the widgets we need.
InputWidget desc(app, prefix + "Value.DESC", PVPutType::String);
InputWidget val(app, prefix + "Value.VAL", PVPutType::Double);
InputWidget twv(app, prefix + "TweakVal.VAL", PVPutType::Double);
ButtonWidget twf(app, prefix + "TweakFwd.PROC", " + ");
ButtonWidget twr(app, prefix + "TweakRev.PROC", " - ");
Any widget that a user can interact with must be added to a Container. The general pattern is to
group related widgets into a Container that matches their layout direction (Vertical or Horizontal),
then pipe a Renderer onto it to define its visual layout. This keeps interactivity and rendering
together in one self-contained unit.
Our application has two logical groups: the DESC and VAL fields stacked vertically, and the tweak buttons arranged horizontally. We create a container for each:
auto top_container = Container::Vertical({
    desc.component(),
    val.component(),
}) | Renderer([&](Element) {
    return vbox({
        hbox({
            text("DESC: "),
            desc.component()->Render()
                | size(WIDTH, EQUAL, 15)
                | EPICSColor::edit(desc),
        }),
        separator(),
        hbox({
            text("VAL: "),
            val.component()->Render()
                | size(WIDTH, EQUAL, 11)
                | EPICSColor::edit(val),
        }),
    });
});

auto tweak_container = Container::Horizontal({
    twr.component(),
    twv.component(),
    twf.component(),
}) | Renderer([&](Element) {
    return hbox({
        twr.component()->Render(),
        separatorEmpty(),
        twv.component()->Render()
            | size(WIDTH, EQUAL, 5)
            | EPICSColor::edit(twv),
        separatorEmpty(),
        twf.component()->Render(),
    });
});
Each container owns its widgets and knows how to render them. The Renderer lambda
receives an Element argument (which can be ignored) and returns the visual layout
using FTXUI’s vbox/hbox functions. For each widget we call its Render() function
then apply styles to it with the | operator. You’ll also notice the EPICSColor
namespace which defines some convenience functions for applying standard color schemes which
also change if connection to the PV is lost. Following the style of MEDM, widgets with
EPICSColor will be rendered as white for both the foreground and background if the
underlying PV is disconnected.
Finally, we compose the two containers into a top-level container and run the application:
auto container = Container::Vertical({
    top_container,
    tweak_container,
}) | Renderer([&](Element) {
    return vbox({
        top_container->Render(),
        separatorEmpty(),
        tweak_container->Render(),
    }) | size(WIDTH, EQUAL, 20);
});

app.run(container);
For more details on the FTXUI layout system, consult the FTXUI documentation and example code.
Load the test database in an IOC with a P macro of your choosing, e.g. softIoc -m "P=MyIoc:" -d tutorial.db.
Then compile and run the tutorial application: ./tutorial MyIoc:
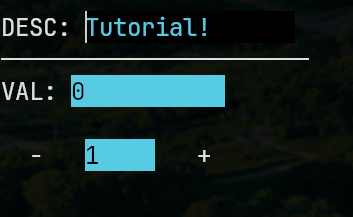
You should have a PVTUI application as in the screenshot below. Clicking plus or minus will add/subtract the TweakVal to Value.
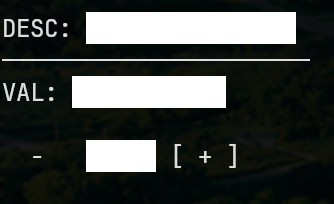
and if the PVs are not connected, it will look like this:
That’s it. Below the full code is provided (also located at tests/tutorial.cpp).
At this point you might still be missing some details needed to make more complex applications. The best way to
learn is by looking through the provided applications here, and also in the FTXUI repository.
#include <pvtui/pvtui.hpp>
#include <ftxui/component/component.hpp>

using namespace ftxui;
using namespace pvtui;

int main(int argc, char *argv[]) {

    pvtui::App app(argc, argv);

    auto pos_args = app.args.positional_args();
    if (pos_args.size() < 2) {
        printf("Usage: tutorial <prefix>\n");
        return EXIT_FAILURE;
    }
    const std::string prefix = pos_args[1];

    InputWidget desc(app, prefix + "Value.DESC", PVPutType::String);
    InputWidget val(app, prefix + "Value.VAL", PVPutType::Double);
    InputWidget twv(app, prefix + "TweakVal.VAL", PVPutType::Double);
    ButtonWidget twf(app, prefix + "TweakFwd.PROC", " + ");
    ButtonWidget twr(app, prefix + "TweakRev.PROC", " - ");

    auto top_container = Container::Vertical({
        desc.component(),
        val.component(),
    }) | Renderer([&](Element) {
        return vbox({
            hbox({
                text("DESC: "),
                desc.component()->Render()
                    | size(WIDTH, EQUAL, 15)
                    | EPICSColor::edit(desc),
            }),
            separator(),
            hbox({
                text("VAL: "),
                val.component()->Render()
                    | size(WIDTH, EQUAL, 11)
                    | EPICSColor::edit(val),
            }),
        });
    });

    auto tweak_container = Container::Horizontal({
        twr.component(),
        twv.component(),
        twf.component(),
    }) | Renderer([&](Element) {
        return hbox({
            twr.component()->Render(),
            separatorEmpty(),
            twv.component()->Render()
                | size(WIDTH, EQUAL, 5)
                | EPICSColor::edit(twv),
            separatorEmpty(),
            twf.component()->Render(),
        });
    });

    auto container = Container::Vertical({
        top_container,
        tweak_container,
    }) | Renderer([&](Element) {
        return vbox({
            top_container->Render(),
            separatorEmpty(),
            tweak_container->Render(),
        }) | size(WIDTH, EQUAL, 20);
    });

    app.run(container);

    return EXIT_SUCCESS;
}